
Hands-on: Building Agentforce AI Agents in Salesforce
- Felipe Elijah

- Feb 10
- 9 min read
Updated: Feb 12
Introduction
Since 2024, BRF Consulting noticed a rapid increase in the use of Agentforce. However, BRF, which specializes in Salesforce Engineering, couldn’t find detailed instructions outside of Trailhead on how to create and build Agentforce AI Agents and Prompt Builder.
Felipe Elijah, a Salesforce Engineer at BRF, gave an overview of this process at BRF’s annual meeting and explained the difference between Salesforce Agentforce and Prompt Builder and how to build them to his colleagues. Watch his presentation below.
Step-by-Step: Foundations to Build Agentforce AI Agents in Salesforce
Here is Elijah's in-depth set of instructions for building AI Agents in Salesforce Agentforce that worked for him.
Before you make Agentforce work, make sure that Salesforce Foundations is activated on your company’s Salesforce platform.
To verify this step, first go to Setup, click on Quick Find, type Einstein Setup, and then toggle the Turn on Einstein button.

Once the Einstein button is enabled, return to Quick Find and type Agentforce. A list will populate below it. Select the option, Agentforce Agents. Then, at the top right corner of the screen, toggle on Agentforce.
After enabling it, click on the + New Agent button next to it.

Building Topics
After creating a New Agent, the next step is to choose the Agent Template, which defines the standard role within the company.
In the following image, I have selected the Agentforce Service Agent option, an AI agent that can interact with potential customers and create or update leads and accounts.

It's worth mentioning that you can select other templates to create an agent for other purposes, or choose the option Create with Gen AI to build an Agent Template from scratch, as shown below:

After making this selection, click Next in the top right-hand corner of the window to choose the pre-selected topics that your agent will handle.
In this case, deselect all the ✓ Added topics, but keep Escalation ✓ Added, which will be required when a potential customer needs to talk directly with a human. Your screen should look like this:

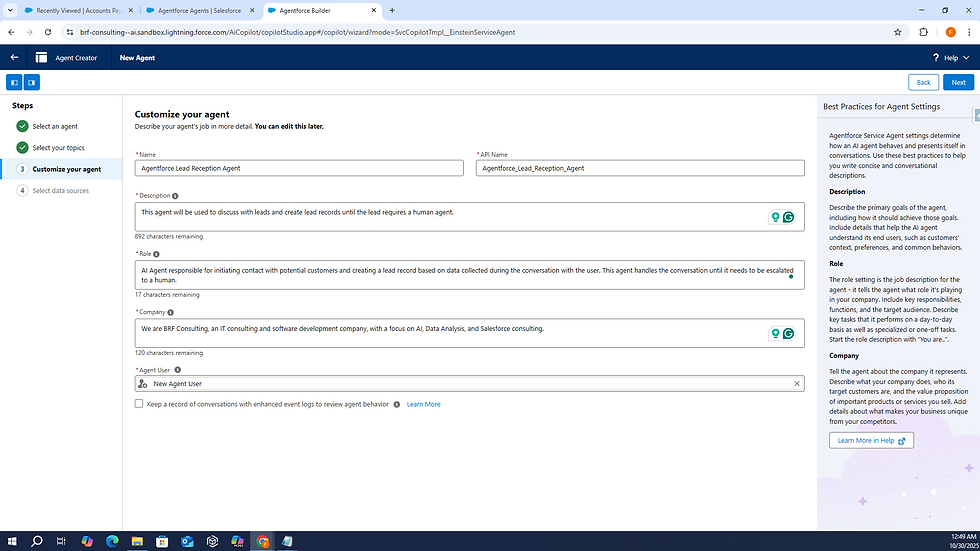
Once this step is completed, click Next and fill in the prompts with the following information:
Name: Agentforce Lead Reception Agent

API Name: Agentforce_Lead_Reception_Agent

Description: This agent will be used to discuss with leads and create lead records until the lead requires a human agent.

Role: AI Agent responsible for initiating contact with potential customers and creating a lead record based on data collected during the conversation with the user. This agent handles the conversation until it needs to be escalated to a human.

Company: We are BRF Consulting, an IT consulting and software development company, with a focus on AI, Data Analysis, and Salesforce consulting.

Agent User: New Agent User (Keep it as is)

⃞ Keep a record of conversations with enhanced event logs to review agent behavior (Leave the box unchecked, as you don't want to use Data Cloud Credits in this scenario)
This is what the page will look like:
Click Next, then Create.
After that, you will be able to start testing your agent. At this point, the Escalation pre-built Topic should be visible.
Click on New and then select + New Topic to create a custom Topic, as this agent requires a custom Topic to handle lead generation.

Inside Create, a Topic Pop-up window will appear. Type the following text in the prompt:
What do you want this topic to do? (Optional): This AI Agent has to make the first contact with potential customersClick Next and fill in the Create a Topic prompt with the following text:
Name: Leads First Contact Management

API Name: Leads_First_Contact_Management

Classification Description: This topic should be used every time the user starts a conversation, stating that they are interested in our services or one of our products, to establish initial contact with the potential customer and understand their needs, until they need to escalate to a human agent.

Scope: Your job is to ensure that every time a potential customer gets in touch with BRF Consulting, mentions our services or products they are interested in, as well as information about the contact behind this lead. The conversation must always close with the potential customer data being recorded in  a lead and contact record, and a confirmation that the information is correct before escalating the conversation to a human.
This is what this window should look like:

Now, click Add Instructions button four times. The Create a Topic window will expand, and you’ll need to fill in the Instructions prompts with the following text:
1. Say hello and give an intro about BRF Consulting, say that we are an IT consulting company with a focus on AI, Data Analysis, and Salesforce consulting, and ask if this is the first contact.

2. Ask the user for their first and last name, business email address, phone number, company name and the service or product of interest, and then use the Create lead action. Also explains that this information is necessary for better communication, and if the user refuses to provide the information or requests to speak directly with a human, escalate the conversation to a human agent.

3. Ask the user to confirm if the business email address is correct, and if the user confirms the information, use the Companies API Action to update the lead with the user's email.

4. Confirm the lead information with the user, and once the collected information is confirmed, escalate the conversation to a human.
The window should look like this:

Click Next, then Finish.
Actions
After completing the Topic and Instructions building, the next step is to create custom Actions that your agent will use during the chat.
In Agentforce, there are currently four types of actions:
Prompt Template Action | Flow Action | Apex Action | API Action |
In this case, we built a Flow Action to create a lead record based on the data from the first steps of the conversation, and an Apex Action to call an External API and update the lead information with data from The Companies API.
To create a Flow Action, go to Quick Find, click on Flows, then click on New Flow, and select Autolaunched Flow.
After this, click on Toolbox in the left corner, select New Resource to add the following variables:
Resource Type: Variable

API Name: FirstName

Data Type: Text

⃞ Available for Input (Check this box)
Click Done.

This is what the new variable FirstName will look like after following the steps completed above. (Screenshot: Salesforce’s Agentforce)
To create a LastName variable, keep the same configuration from the FirstName window, and add the following variables: LastName, Email, PhoneNumber, Company, LeadDescription.
Click Done.
Following this step, create the following element inside the Create Lead Record:
Create Records

Label: Create Lead Record

API Name: Create_Lead_Record

How to set record field values: Manually

Object:Lead
Under Set Field Values for the Lead, attribute each variable to the related fields and values.

Then select New Resource to add the following variable:
Resource Type: Variable

API Name: LeadRecordId

Data Type: Text

⃞ Available for Output (Check this box) 
Note: Don't forget to use the Assignment element so the agent receives the Lead ID as the Output for further use when updating the Lead Record.
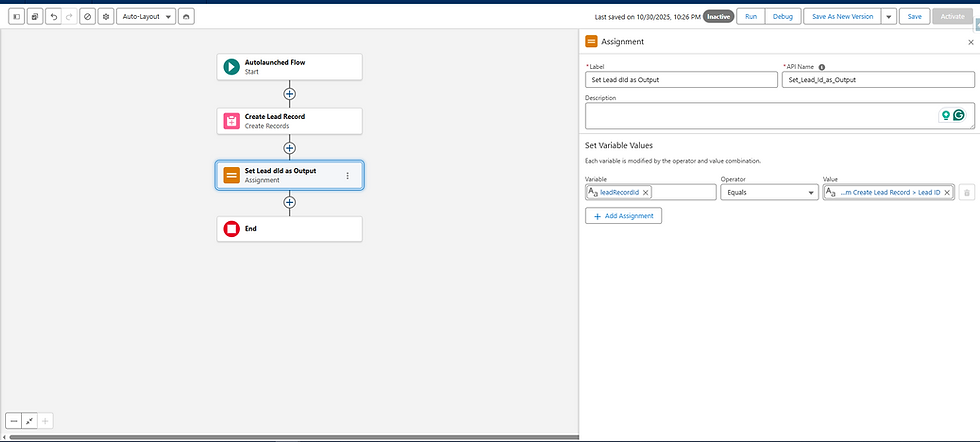
Note: As the original description is a Long Text Area, we built the Lead Description (Lead_Description__c) Field, which is a Text Area Field, to avoid issues with the flow and Agentforce.
Click Save, and add Create Lead Record as the label, and Create_Lead_Record as the API Name, to activate your flow.
Then, go back to the custom Topic inside Agentforce Builder. Select This Topic's Actions, click on New, then click on Create New Action.

At the Create an Agent Action window under Reference Action Type, select Flow. This step will allow the agent to use the Inputs and Outputs during the conversation.
Click Next.

Then, fill in the following inputs and outputs from the flow to help the agent use the correct data from the user to your lead.
Agent Action Instructions: Use this action to create the lead record after retrieving the information about the lead from the user.

Show loading text this action ⃞ (Uncheck this box)

Inputs

Company: Fill this input with the user's company name

FirstName: Fill this input with the user's first name

LastName: Fill this input with the user's last name

Email: Fill this input with the user's email
PhoneNumber: Fill this input with the user's phone number

LeadDescription: Fill this input with the company's interest in our products and services.

Note: Check the option Require input and Collect data from user in all the inputs.

Outputs

leadRecordId: This output contains the lead ID and must be used when the lead ID is requested
Click Finish to enable the flow for your agent to use when creating new leads.

To finish building the agent actions, I created an Apex Action using the following classes:
public class TheCompaniesAPIFormat {

    public class response {
        public company company {get;set;}
    }

    public class company {
        public about about {get;set;}
    }

    public class about {
        public String industry {get;set;}
        public String totalEmployees {get;set;}
    }
}
public class GetAbstractAPI {
public class leadRecordAndDomain{
@InvocableVariable(label='RecordId')
public String recordId;
@InvocableVariable(label='User Email')
public String userEmail;
}
@invocableMethod(label='Retrieve Company Data From The Companies API' callout = true)
public static List<String> GetAbstractAPI(List<leadRecordAndDomain> leadRecordAndDomainList) {
List<String> leadsUpdatedIds = new List<String>();
try{
List<lead> leadsListToUpdate = new List<lead>();
for(leadRecordAndDomain leadRecordAndDomain : leadRecordAndDomainList){
try{
External_API__mdt TheCompaniesAPI = External_API__mdt.getInstance('companiesAPI');
String TheCompaniesAPIEndpoint = TheCompaniesAPI.Base_URL__c+'email='+leadRecordAndDomain.userEmail;
HttpRequest req = new HttpRequest();
req.setMethod('GET');
req.setHeader('Authorization', 'Basic '+ TheCompaniesAPI.Secret_Key__c);
req.setHeader('Content-Type', 'application/json');
req.setEndpoint(TheCompaniesAPIEndpoint);
Http http = new Http();
HTTPResponse res = http.send(req);
system.debug(res.getBody());
TheCompaniesAPIFormat.response leadAPIInfo = (TheCompaniesAPIFormat.response) JSON.deserialize(res.getBody(), TheCompaniesAPIFormat.response.class);
lead leadToUpdate = [SELECT Id FROM lead WHERE Id=: leadRecordAndDomain.recordId ];
leadToUpdate.Industry = leadAPIInfo.company.about.industry;
leadToUpdate.Company_Total_of_Employees__c = leadAPIInfo.company.about.totalEmployees;
system.debug('leadToUpdate.Industry: ' + leadToUpdate.Industry);
system.debug('leadToUpdate.Company_Total_of_Employees__c: ' + leadToUpdate.Company_Total_of_Employees__c);
leadsListToUpdate.add(leadToUpdate);
leadsUpdatedIds.add(leadToUpdate.Id);
} catch(Exception e){
system.debug('Error: ' + e + ' line ' + e.getLineNumber());
}
}
update leadsListToUpdate;
} catch(Exception e){
system.debug('Error: ' + e + ' line ');
}
return leadsUpdatedIds;
}
}After adding the classes inside Agentforce, create a new Apex Action with the following settings:
Agent Action Instructions: You must use this action to update the Company information after the user reveals to you their email, and the Lead is already created

Show loading text this action ⃞ (Uncheck this box)

Inputs

RecordId: Use the lead ID to fill this input" inside the instruction

⃞ Input Required (Check this box)

User Email: (Use the user email to fill this input)

⃞ Input Required (Check this box)

⃞ Collect data from user (Check this box)

Outputs

Output: Display the outputs on the screen
Click Finish.

By following these detailed steps, you should have a fully functional AI agent built into Agentforce and ready to be tested.
Final Considerations
Don't forget to create a permission set or give permissions to your AI agent through your company’s Profile. This will allow the AI agent to view, create, and edit lead information, as well as to access your class with @InvocableMethod. Otherwise, your agent won't be able to use the instructions shared in this article.
Despite Agentforce’s vast usefulness, which allows for a variety of functionalities, such as creating an AI agent to talk with customers in your Salesforce Community Website, it's worth noting that its Flex Credits can be very expensive, even if your company has a disposable budget for its technology department. Keep that in mind when you are building these agents, so that they won't consume more credits per conversation than what you had planned for.
About the author: Felipe Elijah is a Salesforce Engineer at BRF Consulting.
*This article was originally published on 11/11/2025.
BRF Consulting is a Salesforce ISV partner specializing in Salesforce Agent Force, Artificial Intelligence, Data Engineering, and Software Development that can help your business scale up and become more efficient. For more information about our services, email us at contact@brfconsulting.com. |


Comments